domenica 16 agosto 2015

Samsung SIII, Stagefright and Cyanogenmod 11

2015-09-01: Update
Cyanogenmod issued a new version of CM11 for the samsung SIII (intl) https://download.cyanogenmod.org/?device=i9300&type=snapshot

2015-08-17: Update
It seems that Cyanogenmod will issue an update also for CM11: http://www.cyanogenmod.org/blog/more-stagefright

Introduction
I have a Samsung S3 phone equipped with Cyanogenmod 11. I chosen Cyanogenmod because I believe the community support is better than the Samsung one. Unfortunately the Stagefright bugs [1] highlighted a different reality: if I want to use Android 4.x on my phone I will not be protect by the Stagefright bugs.
To be honest, Cyanogenmod 12 is (will be) patched from this bug, but I don't want to use this version because I don't like it.
Instead Samsung seems to don't support anymore this phone; so no update will be available. Pay attention that on the basis of the OpenSignal data, the Samsung SIII is still one of the most diffuse devices [2].
To check if my phone is vulnerable, I used the Stagefright Detector app [3]. The results are shown below.
On the site of Zimperium it is possible to access to the patches which fix the bug [4].

Fixing my phone
USE THESE INFORMATION AT YOUR OWN RISK; PLEASE BE AWARE THAT ANY INFORMATION YOU MAY FIND HERE MAY BE INACCURATE, MISLEADING, DANGEROUS.
I followed the Cyanogenmod tutorial [5] to compile the source.
First, I downloaded the Cyanogenmod source [7] (be patient, I needed 18h to download all the source) and I applied the Zimperium patches. I had to adapt the patches to the downloaded source: some patches were not applicable (may be these are related to more recent source) and others were already applied. So I applied only 7 patches. You can download the source from my github-repository [6].
I compiled only the frameworks/av module with the command mma, then I copied the file "$(OUT_DIR)/target/product/i9300/obj/lib/libstagefright.so" in /system/libs. Pay attention that I had to remount the /system filesystem read-write in order to copy the library on the phone.
Links
[1] https://en.wikipedia.org/wiki/Stagefright_(bug)
[2] http://opensignal.com/reports/2015/08/android-fragmentation/
[3] https://play.google.com/store/apps/details?id=com.zimperium.stagefrightdetector&hl=en
[4] https://blog.zimperium.com/stagefright-vulnerability-details-stagefright-detector-tool-released
[5] https://wiki.cyanogenmod.org/w/Build_for_i9300
[6] https://github.com/kreijack/android_frameworks_av.git branch cm11-zimperium-patches
[7] repo init -u https://github.com/CyanogenMod/android.git -b cm-11.0; repo sync

sabato 29 novembre 2014

Metacity window manager: changing the window color border

Few months ago I started to use MATE [1] as desktop. I like it because it is simple and clean. My preferred theme is ClearLooks. Another setting that I adopt everywhere in linux is the so called mouseover window focusing coupled with the raise on click disabled.
Basically I like to work with windows even partially obscured. The focus has to be independent by the window placing.
To bring up a windows I (left) click on the title bar. To put back a window I have to middle-click the title bar.
Metacity, the default window manager of Mate, allows that and I am happy.
To work well I have to quick find the title bar. Unfortunately today the designers think that a title bar of an unfocused window is not an important thing, so its color is the same of the other GUI elements (like buttons)...
To solve this I had to make a small change to the theme file.
What I am describing here is valid for the Metacity window manager, and worked for Mate; but I suppose that it should work also for other desktop environments which use Metacity.
I started from the ClearLooks theme, but I suppose that the same applies for other themes too.
  1. As first step I copied the theme in my home:
    
    $ cd
    $ mkdir .themes
    $ cp -rf /usr/share/themes/ClearLooks .theme/ClearLooksGray
    $ mv 
    
    The name ClearLooksGray is an arbitrary name. Choice what you want.
  2. Now you have to edit the file .theme/ClearLooksGray/index.theme. You will notice that most of the lines are like Name[<country code>]=<something> or Comment[<country code>]=<something>. For simplicity I removed all these line until I got:
    
    [X-GNOME-Metatheme]
    Name=ClearlooksGray
    Type=X-GNOME-Metatheme
    Comment=Attractive Usability
    Encoding=UTF-8
    GtkTheme=Clearlooks
    MetacityTheme=ClearlooksGray
    IconTheme=gnome
    
    Basically I removed all the Name/Comment pairs in the different language and I leaved only the necessary ones. Then I update the Name and the MetacityTheme values to reflect the new name (ClearlooksGray).
  3. Then I changed the file .themes/ClearLooksGray/metacity-1/metacity-theme-1.xml: inside the tag <info>, I update the tags:
    • name: changed the value in ClearLooksGray
    • authors: added my name
    • description: update the value to reflect the new name

    Now the complex part. Inside the file you have to find a tag called <draw_ops name="bevel_unfocused">. This tag is responsible to drawing the unfocused title bar. Inside this tag there are the following lines:
    
            <gradient type="vertical" x="2" y="top_height/2" width="width-4" height="top_height/2-1">
                    <color value="shade/gtk:bg[NORMAL]/0.93"/>
                    <color value="shade/gtk:bg[NORMAL]/0.89"/>
            </gradient>
            <gradient type="vertical" x="2" y="2" width="width-4" height="top_height/2-2">
                    <color value="shade/gtk:bg[UNFOCUSED]/0.99"/>
                    <color value="shade/gtk:bg[UNFOCUSED]/0.95"/>
            </gradient>
    
    These have to be changed in:
    
            <gradient type="vertical" x="2" y="top_height/2" width="width-4" height="top_height/2-1">
                    <color value="shade/#cccccc/0.93"/>
                    <color value="shade/#cccccc/0.89"/>
            </gradient>
            <gradient type="vertical" x="2" y="2" width="width-4" height="top_height/2-2">
                    <color value="shade/#cccccc/0.99"/>
                    <color value="shade/#cccccc/0.95"/>
            </gradient>
    

    Basically I changed "gtk:bg[NORMAL]" in "#cccccc" and "gtk:bg[UNFOCUSED]" in "#cccccc". These changes have to be re-done also inside the tag:<draw_ops name="bevel_maximized_unfocused">. This tag is responsible to drawing the unfocused title bar for the maximized window. So the original code is:
    
            <gradient type="vertical" x="0" y="top_height/2" width="width" height="top_height/2-1">
                    <color value="shade/gtk:bg[NORMAL]/0.93"/>
                    <color value="shade/gtk:bg[NORMAL]/0.89"/>
            </gradient>
            <gradient type="vertical" x="2" y="2" width="width-4" height="top_height/2-2">
                    <color value="shade/gtk:bg[UNFOCUSED]/0.99"/>
                    <color value="shade/gtk:bg[UNFOCUSED]/0.95"/>
            </gradient>
    

    and ahve to changed in:
    
            <gradient type="vertical" x="0" y="top_height/2" width="width" height="top_height/2-1">
                    <color value="shade/#cccccc/0.93"/>
                    <color value="shade/#cccccc/0.89"/>
            </gradient>
            <gradient type="vertical" x="2" y="2" width="width-4" height="top_height/2-2">
                    <color value="shade/#cccccc/0.99"/>
                    <color value="shade/#cccccc/0.95"/>
            </gradient>
    

    #cccccc is the gray HTML color. You can choice a different color of course.
Below two screen shot which highlight the differences: the ClearLooksGray have a darker border that I like more.

ClearLooksGray

ClearLooks [standard]

venerdì 22 agosto 2014

Booting a powermac

Preamble


I bought an used powermac, I was ever interested to this architecture: both the OpenFirmware and the powerpc processor fascinating me.
The machine was an old dual PowerPc @ 1GHz, equipped with 512MB of ram. The model was the one called PowerMac MDD (Mirrored Drive Doors).


Because it was an old and used machine, the machine had some problems:
  • after few minutes, the system shut-down unconditionally, both under Mac OS X and Linux. I solved replacing the CPU-Board. I suspected that a temperature sensor drifted.
  • time to time I noticed that some application under OS X crashed; some packages under linux were currupted. I solved replacing the memory.
Apart these problems, I am happy. And the to be honest, I like to resolve these kinds of issues :-)

Upgrading Mac OS X


When I tried to upgrade Mac OS X from 10.3 to 10.4, I had to use an USB stick (even the dvd reader didn't worked well) : first I copied the DVD image to the USB stick, then I faced the problem on HOW boot the machine from USB.
On a pc (I.E. a x86 one), it would be sufficient to select from the boot menu the USB stick as source. But in this kind of Macintosh, the things are different .... and more interesting !

OpenFirmware


Instead of the BIOS, these machine have "OpenFirmware". From an user point of view, OpenFirmware seems less capable of a BIOS. But OpenFirmware has its points of forces: for example it is an environment fully programmable, and it is also capable to access file inside a filesystem.
In this post I will introduce some OpenFirmware concepts, but definitely it has not to be considerable a course on OpenFirmware.

Access OpenFirmware


To access the OpenFirmware interface, you have to press 4 keys: CMD + OPTION + O + F. To access the BIOS interface usually it is needed to press one key (typically DEL !).
But there is another more interesting way to access OpenFirmware: via telnet ! This fact is enough to consider OpenFirmware a lot better than a classic BIOS !
To allow the telnet access to the OpenFirmware console, once you pressed the CMD-OPTIONS-O-F keys, you have to do the following commands:
0 > dev /packages/telnet  ok
0 > " enet:telnet,192.168.10.47" io
Where 192.168.10.47 will be the IP used by the telnet server; you of course this IP have to be compatible with your network. In bold I highlights the prompt of OpenFirmware (typically 0 > and ok). Pay attention to the space after " (double quote).
Now to access OpenFirmware it is sufficient doing a telnet to the ip 192.168.10.47.

Devices tree


Usually on the OpenFirmware system, the hardware configuration are exported via an hierarchical structure which resemble a filesystem. This kind of structure is called device tree.
To see the device tree, you have to use the ls and dev commands. ls is like the ls unix command (or dir "dos" command); instead dev is like the cd command.

0 > dev /  ok
0 > ls
ff87f638: /cpus
ff87f8e8:   /PowerPC,G4@0 
ff87fd10:     /l2-cache
ff87ff48:       /l2-cache
ff880ba8:   /PowerPC,G4@1
ff880fd0:     /l2-cache
ff881208:       /l2-cache
ff881518: /chosen
ff881730: /memory@0
ff8819d0: /openprom
ff881b78:   /client-services
ff882e60: /rom@ff800000
ff883060:   /boot-rom@fff00000
ff883290:   /macos
ff883398: /options
ff8834a0: /aliases
ff8854a8: /packages
ff885588:   /deblocker
ff885f20:   /disk-label
ff8869e8:   /obp-tftp
ff8902c8:   /telnet       
ff890bc8:   /mac-parts
ff892478:   /mac-files
ff895430:   /hfs-plus-files
ff89a4b0:   /fat-files
ff89c2a8:   /iso-9660-files
ff89d108:   /bootinfo-loader
ff89ed78:   /xcoff-loader
ff89f810:   /pe-loader
ff8a0260:   /elf-loader
ff8a1908:   /usb-hid-class
ff8a4498:   /usb-ms-class
ff8a70e8:   /usb-audio-class
ff914c60:   /sbp2-disk
ff917820:   /ata-disk
ff919d60:   /atapi-disk
ff91bef0:   /bootpath-search
ff922870:   /terminal-emulator
ff922980: /firewire-disk-mode
ff9383b0: /pseudo-hid 
ff9384b0:   /keyboard
ff938ba8:   /mouse
ff939140:   /eject-key
ff939610: /pseudo-sound
ff939940: /multiboot
ff94d758: /diagnostics
ff94d838: /nvram@fff04000
ff94e488: /uni-n@f8000000
ff94e960:   /i2c@f8001000
ff94f478:     /fan@58
ff9502f8:     /i2c-hwclock@ca
ff950ae0:     /temp-monitor@92
ff9511c8:     /cereal
ff9518f8: /pci@f0000000
ff99cde0:   /uni-north-agp@b
ff99d0f0:   /ATY,PheonixParent@10
ff9b9048:     /ATY,Pheonix_A
ff9baa50:     /ATY,Pheonix_B
ff952b58: /pci@f2000000   
ff9555e8:   /mac-io@17
ff95c0c8:     /interrupt-controller@40000
ff95c318:     /gpio@50
ff95c548:       /extint-gpio1@9
ff95c838:       /programmer-switch@11
ff95cae0:       /gpio5@6f
ff95cd00:       /extint-gpio15@67
ff95cf88:       /gpio6@70
ff95d1a8:       /extint-gpio16@68
ff95d498:       /extint-gpio14@66
ff95d720:       /gpio12@76
ff95d938:       /gpio11@75
ff95db50:     /escc-legacy@12000
ff95ddc0:       /ch-a@12004
ff95dfc0:       /ch-b@12000
ff95e1c0:     /escc@13000
ff95e448:       /ch-a@13020
ff95ee70:       /ch-b@13000
ff95f808:     /i2s@10000  
ff95fa38:       /i2s-a@10000
ff95fd68:         /sound
ff960600:     /timer@15000
ff9607f8:     /via-pmu@16000
ff963ec0:       /pmu-i2c
ff964ce0:         /i2c-hwclock@1d4
ff965590:         /i2c-hwclock@1c8
ff965e10:       /rtc
ff966508:       /power-mgt
ff9bea18:         /usb-power-mgt
ff966818:     /i2c@18000
ff9672d0:       /cereal
ff967a00:       /deq
ff967b40:     /ata-4@1f000
ff96a880:       /disk
ff96b0c0:     /ata-3@20000
ff96de00:       /disk
ff97a580:   /usb@18
ff9bc960:     /hub@1      
ff9bcb68:       /mouse@1
ff9bce88:       /device@3
ff9bd000:         /keyboard@0
ff9bd390:         /interface@1
ff982208:   /usb@19
ff9bc630:     /disk@1
ff953dd8: /pci@f4000000
ff989fd0:   /ata-6@d
ff98d1b8:     /disk
ff98d7f0:   /firewire@e
ff9979f8:   /ethernet@f
ff9beee0:     /ethernet-phy
ff955038: /vsp@f9000000
ff955328:   /veo@f9080000
ff955488:   /veo@f9180000
 ok
In the list above note the PCI/AGP/USB bus and their children. Note also inside the "/packages" directory the packages

ff895430:   /hfs-plus-files
ff89a4b0:   /fat-files
ff89c2a8:   /iso-9660-files
as reporte above the Apple OpenFirmware is capable to access some filesystems. In this case these packages allow to access:
  • HFS+
  • FAT filesystem
  • ISO-9660 (the one used in the cdrom)
Pay also attention to the leaves "disk@NN" below ata-X and usbX: these represent the disks.

Another interesting command is devalias, which lists some devices and their alias:

0 > devalias 
pci0                /pci@f0000000
agp                 /pci@f0000000
pci1                /pci@f2000000
pci2                /pci@f4000000
ui2c                /uni-n/i2c
ui2c-serial         /uni-n/i2c/cereal
keyboard            /pseudo-hid/keyboard
mouse               /pseudo-hid/mouse
sound               /pseudo-sound
eject-key           /pseudo-hid/eject-key
nvram               /nvram
enet                /pci@f4000000/ethernet
fw                  /pci@f4000000/firewire
pci                 /pci@f2000000
usb0                /pci@f2000000/usb@18
usb1                /pci@f2000000/usb@19
mac-io              /pci@f2000000/mac-io@17
mpic                /pci@f2000000/mac-io@17/interrupt-controller
hd                  /pci@f4000000/ata-6@d/disk@0
cd                  /pci@f2000000/mac-io@17/ata-3@20000/disk@0
ide0                /pci@f2000000/mac-io@17/ata-3@20000/disk@0
ide1                /pci@f2000000/mac-io@17/ata-3@20000/disk@1
ultra0              /pci@f4000000/ata-6@d/disk@0
ultra1              /pci@f4000000/ata-6@d/disk@1
scca                /pci@f2000000/mac-io@17/escc/ch-a
sccb                /pci@f2000000/mac-io@17/escc/ch-b
ki2c                /pci@f2000000/mac-io@17/i2c
ki2c-serial         /pci@f2000000/mac-io@17/i2c/cereal
via-pmu             /pci@f2000000/mac-io@17/via-pmu
rtc                 /pci@f2000000/mac-io@17/via-pmu/rtc
pi2c                /pci@f2000000/mac-io@17/via-pmu/pmu-i2c
wireless            /pci@f2000000/mac-io@17/@30000
ultra2              /pci@f2000000/mac-io@17/ata-4@1f000/disk@0
ultra3              /pci@f2000000/mac-io@17/ata-4@1f000/disk@1
cd1                 /pci@f2000000/mac-io@17/ata-3@20000/disk@1
fan                 /uni-n/i2c/fan
veo0                /vsp@f9000000/veo@f9080000
veo1                /vsp@f9000000/veo@f9180000
last-boot           /pci@f4000000/ethernet@f
screen              /pci@f0000000/ATY,PheonixParent@10/ATY,Pheonix_A
 ok

Typically hd is the first disk, ultra1 is the secondary disk; usb0/usb1 are the usb ports (my powermac has only two usb ports !).

Give a more deeper look to the usb interface. From the device-tree list above, we know that under usb0 (/pci...usb@18) there is the apple mouse and keyboard. Instead under usb1 (/pci...usb@19) there is a disk.
To access a disk the full path is like:
/pci@f2000000/usb@19/disk@1
( or /pci@f4000000/ata-6@d/disk@0 considering an ata disk)
Adding ":nn" at the end of these "path", we identify a partition; as example the dir command will show the content of a filesystem inside the 2nd partition:

0 > dir /pci@f2000000/usb@19/disk@1:2,\ 

     Size/        GMT                      File/Dir
     bytes   date     time   TYPE CRTR     Name
        82  3/21/ 5  4:25:52              ._Install%20Mac%20OS%20X
     12292 10/10/ 5 22: 4:45              .DS_Store
            8/ 4/14 17:53:21              .Spotlight-V100
            8/ 4/14 18:49:47              .Trashes
            3/21/ 5  0: 1:29              .vol
            3/28/ 5  5:26:30              Applications
            3/28/ 5  6:42:12              bin
            3/23/ 5  2:36:40              dev
        11  3/28/ 5  6:23:29  slnk rhap   etc
            3/28/ 5  4:21:28              Install%20Mac%20OS%20X
            3/18/ 5 21: 4:34              Japanese%20-%20%u65e5%u672c%u8a9e
            3/28/ 5  6:32:40              Library
        11  3/28/ 5  6:23:29  slnk rhap   mach
   4313028  3/26/ 5 22:15:41              mach_kernel
            3/26/ 5  1: 0: 2              Optional%20Installs.mpkg
            3/28/ 5  6:23:29              private
            3/21/ 5  3: 7:27              Read%20Before%20You%20Install.app
            3/28/ 5  6:41:12              sbin
            3/28/ 5  5:26: 8              System
        11  3/28/ 5  6:23:31  slnk rhap   tmp
            3/28/ 5  5:30:43              usr
        11  3/28/ 5  6:23:32  slnk rhap   var
            3/21/ 5  0: 1:29              Volumes
            3/21/ 5  3: 7:27              Welcome%20to%20Tiger.app
            3/28/ 5  5:19:56              HFS+%20Private%20Data
 ok
Note the using of the backslash as filesystem root (or path separator) after a comma.
To look inside a directory:

0 >dir /pci@f2000000/usb@19/disk@1:2,\System 

     Size/        GMT                      File/Dir
     bytes   date     time   TYPE CRTR     Name
            3/28/ 5  5:30:51              Installation
            3/28/ 5  7:13:30              Library
 ok

To give a look to the boot loader

0 > dir /pci@f2000000/usb@19/disk@1:2,\System\Library\CoreServices 
     Size/        GMT                      File/Dir
     bytes   date     time   TYPE CRTR     Name
        82  3/28/ 5  6:55:33              ._Volume%20Name%20Icon
      1445  8/ 4/14 18:49:47  tbxj chrp   .disk_label
        23  8/ 4/14 18:49:47              .disk_label.contentDetails
    174276  3/28/ 5  6:55:35  tbxi chrp   BootX
            3/26/ 5  5:31:25              CharacterSets
....

Where BootX is the Mac OS X boot loader (note the "tbxi" in the 4th column).

Booting

To boot from a usb stick, we have to do:

0 > boot /pci@f2000000/usb@19/disk@1:2,\System\Library\CoreServices\BootX
Where:
  • boot is the command to boot (which else ?)
  • /pci@f2000000/usb@19/disk@1 is the path which identifies a USB stick.
  • :2 this is the partition which contains the filesystem where is the boot loader
  • , (comma) is a separator (which else ?)
  • \System\Library\CoreServices\BootX is the path of the bootloader inside the filesystem.
Few notes:
  • Note the use of the slash (/) as separator in the device tree elements, instead it is used the backslash as separator of the elements of a filesystem path
  • the path of the disk and the partition number may vary depending of your configuration and disk partitioning.

To simplify a bit the things,we can use also the devalias aliases. For example we can do:

0 > dir usb1/disk@1:2,\System\Library\CoreServices
because usb1 is an .. alias of /pci@f2Note the use of the backslash as separatator instead of the slash, which is used as separator of the device-tree000000/usb@19 (see above). So if we would look at the 9th partition of the firs disk (alias hd) do:

0 > dir hd:9,\
Where "hd" identifies the first disk, ":9" the 9th partition, and ",\" identifies the root of the filesystem.

When using the "boot" command, instead of a fully path, you can pass "\\:tbxi". "\\" means the system folder, and ":tbxi" means a file type "tbxi". "\\:tbxi" is an alias for th Apple bootloader (which is under a system folder and it is marked as tbxi file type). But these are Apple/hfs+ specific things.

Conclusion


This post highlighted some concepts about the devices in the OpenFirmware. Also it has shown how boot a PowerMac from an usb stick.
In my opinion OpenFirmware is a very flexible firmware, and has a lot of capability.
I hoped to help a bit to understand how manage these capabilities.

Goffredo Baroncelli
- 
gpg @keyserver.linux.it: Goffredo Baroncelli <kreijackATinwind.it>
Key fingerprint BBF5 1610 0B64 DAC6 5F7D  17B2 0EDA 9B37 8B82 E0B5

domenica 15 giugno 2014

BTRFS and systemd-journal

Preface


The BTRFS filesystem and Systemd are two news projects in the Linux eco-system. Systemd is the new init system, which is becoming default for the most distributions; in fact even Debian and Ubuntu have program to switch to it.
The same is true for the BTRFS filesystem, which is considered the next gen linux filesystem.
In this post I will analyse a performance problem which happens when the Systemd log system (journald) is used on a Btrfs filesystem.

Introduction


Recently I switched from Debian to Fedora, because I was interested in Systemd, and the one shipped by Debian was quite old (204 vs 208). From the beginning I noticed that the Fedora boot time was longer than the Debian one. Initially I thought the better Debian performances were due to the fact that Debian is more light than Fedora (less number of service enabled). But after some tailoring the boot time still was longer.
However I didn't care it enough, because the boot is performed only one or two times per day. So this didn't hurt me too much
But recently I looked at this bug Bug 1006386 - Journal flushing often slow, can prevent system booting correctly[1]. Here was reported a performance problem due to the flushing of the journal on the permanent storage. So I decided to investigate a bit more deeply this issue.

Systemd journal


Systemd introduced a new log daemon called journald. It has some nice properties, one of the most important is that it is started from the beginning (it is even present in the initramfs). Due to the fact that during the early stages of the boot, there is no availability of a persistent storage, all the log were stored in a tmpfs filesystem, and only when a permanent storage is available all the information are flushed to the disk.
It must be noticed that other option are available, but this is the Fedora default.
It seems that during this flushing, all daemons which are trying to log something are blocked by journald.
My tests revealed that this flushing may requires a long time. This is due to the BTRFS COW filesystem nature which doesn't behave well with the log file structure of Journald.
However defragmenting the log file of Journald reduces the boot time.
Doing
# btrfs filesystemd defrag /var/log/journal/189323cd4cc348159b9fd5b32b566b05/system.journal
leaded a boot time reduction by 20 second on three different machines. Is an huge value, which suggested me to perform further tests. (note 189323cd4cc348159b9fd5b32b566b05 is the machine-id and it is likely different on each machine).
Of course I have to point out that this results was due to the bad interaction between BTRFS and the Journald log file. Other setup might lead to different results.

My tests


I took an old machine (a P4 2.5GHz with 512MB of ram) where was present a fresh installation of a Fedora 20 and I measured the boot time during several reboots (up to 70). The results were very impressive. I tested the following scenarios
  1. standard (without defragmenting any file, without readahead)
  2. defragment the journal file at the end of the boot
  3. defragment the journal file before the flushing
  4. mark as NOCOW the journald log file
  5. enable the systemd-readahead
  6. remove the fsync(2) call from journald
  7. remove the posix_fallocate(3) call from journald
  8. do a defrag when posix_fallocate(3) is called
  9. do a defrag when the journal log file is opened
Each batch of tests started with an empty log file. The time measured was the boot time as reported by systemd-analyze (the userspace time). On each chart was also reported the number of extents as reported by the filefrag command

1) Standard
This test was performed without any strategies to mitigate the performance problem. I repeated the reboot about 70 times, doing two defrag in the middle (at test #37 and #53). At the beginning the boot time was less than 20 seconds, then it increases up to 55-60 seconds. Defragmenting the journal file helped, reducing the boot time of about 20 seconds. What was impressive is the number of extents: at the end of test these were near 8000. The journald log file size was 64MB.


2) Defragment the journal at the end of the boot
The test was performed doing a defrag at the end of each boot (after 30 seconds). The number of reboots were 56. The boots times were always between 15s and 20s. The number of extents were between 2000 and 3000 extents.

3) Defragment the journal before flushing the data to the disk
The test was performed doing a defrag before flushing the data to the disk. The number of reboots were 60. The boots times were between 15s and 20s. The number of extents were between 2000 and 3000.

4) Mark NOCOW the journald log file
This test was performed marking the journal file NOCOW. This disable the COW behaviour increasing the speed. Unfortunately this also removes the checksum of the file. The boots times were a bit less than the previous tests. The extents were two orders of magnitudes lower (30 vs 3000).

5) Enable the systemd-readahead
All test were performed with systemd-readahead disabled. Then Kai Krakow [2] pointed me that the systemd readahead service is able to defrag. So I tested also this configuration. The result was very bad like the first one. The reason is that systemd readahead doesn't take care of the Journald log file for some reason. Further investigation is needed.
Update 2014-06-17: systemd-readahead doesn't consider file bigger than 10M; this is the reason because the system.journal is never defragmented.


6) Remove the fsync(2) system call from journald
I tweaked the source of systemd-journald removing the fsync(2) call. But after 36 reboot I didn't notice any improvement, with the exception of a smaller number of extents.

7) Remove the posix_fallocate(3) system call from journald

I tweaked the source of systemd-journald removing the posix_fallocate(3) call. But after 34 reboots I didn't notice any improvement: the boot time was up to 40s and the number of extents was greater than the previous test.


8) Do a defrag before calling the posix_fallocate(3) system call

I tweaked the source of systemd-journald, so before the posix_fallocate(3) call the file is defragmented. The chart shows the decrement of the number of extents when the posix_fallocate(3) is called. However the boot time reached a (bad) value of 50 seconds.

9) Do a defrag when the journal file is opened

I tweaked the source of systemd-journald in order to defrag the journal file each time it is opened. This test reached the same (good) result of the test #3; the boots times is between 15 and 30 seconds.

Conclusions


My tests confirmed the bad interaction between the Systemd log daemon with the BTRFS filesystem. The log file fragments quickly and the performance decrease (see test #1).
Doing a periodic defragmentation, the boots times don't increase too much (See test #2, #3 and #9), both if the defragmentation is performed before the journal flushing and if it is performed at the end of the boot.
Another good strategy is to mark the file NOCOW [3] (test #4); however it must be pointed out that also the checksumming protection is lost. This could be a limit in a multi-disk (RAID) btrfs filesystem scenario, because the checksum is used to discard a corrupted sector.
Systemd implements, in its readahead-* helpers, a defrag strategy which would alleviate this kind of problem. But I was not able to get it working properly (test #5). Further investigation is needed. However I discovered systemd-readahead ignores files greater than 10M. To understand that I had look at the code.
I also tried to change the source of systemd-journald removing the fsync() or the posix_fallocate() call, to verify if these are a cause of the problem. But the tests #6 and #7 seem to suggests that the problem is elsewhere.
In the last tests (#8 and #9) I tweaked the source in order to do the defrag from Journald daemon. Doing a defrag during the open of the journal file seems to have the same (good) results got in the test #3.

I decided to adopt a strategy like the test #2: I added a new job which defrags all the files greather than 10MB under /var each day. So I covered other cases were the files are higly fragmented. Below my .service and .timer systemd unit. Be aware that I am not a systemd expert, so I am open to suggestion on how improve these units.

# file defrag-var.service
[Unit]
Description=Defrag the /var subdirs

[Service]
Type=simple
ExecStart=/bin/bash -c 'find /var/ -xdev -size +5M | xargs -l btrfs fi defrag'


# file /etc/systemd/system/defrag-var.timer 
[Unit]
Description=Defrag the /var subdirs

[Timer]
OnBootSec=1m
OnUnitActiveSec=1d

[Install]
WantedBy=multi-user.target


References


domenica 27 maggio 2012

An 8E filesystem

Update 2012-10-06.

Introduction

This small post shows how create a 8 exabyte filesystem on a linux box.
8 Exabyte are 263 bytes. See this link [1] to wikipedia for knowing more on the number prefix. Anyway 8 Exabyte are 8192 Petabyte, which are 8388608 Terabyte..
Of course you we not be able to obtain a real 8E filesystem, but you will be able to simulate it.

Prerequisites

The following prerequisites are needed:
  • a Linux box with a modern kernel ( I tested with a 3.4 kernel)
  • a BTRFS filesystem,

Creating the file system

The idea is to create a "sparse" file[3], to mount it with the loopback device a then to create the filesystem.
  • Create the "sparse" file
    dd if=/dev/zero of=8E-file bs=1 count=1 seek=$(((1<<63)-2))
    1+0 records in
    1+0 records out
    1 byte (1 B) copied, 0.000268343 s, 3.7 kB/s
    ghigo@venice:/tmp$ ls -lh 8E-file 
    -rw-r--r-- 1 ghigo ghigo 8.0E Dec 25 23:15 8E-file
    
    The trick here is the option seek of the command dd. This option move the file pointer forward without writing (and without consuming)any byte.

  • Formatting the "sparse" file
    ghigo@venice:/tmp$ /sbin/mkfs.btrfs 8E-file
    WARNING! - Btrfs Btrfs v0.19 IS EXPERIMENTAL
    WARNING! - see http://btrfs.wiki.kernel.org before using
    
    fs created label (null) on 8E-file
     nodesize 4096 leafsize 4096 sectorsize 4096 size 8.00EB
    Btrfs Btrfs v0.19
    
  • Creating the loopback device
    ghigo@venice:/tmp$ sudo losetup -f 8E-file 
    ghigo@venice:/tmp$ sudo losetup -a
    /dev/loop0: [0012]:583736 (/tmp/8E-file)
    
    It must be point out to "formatting" the file and not the loopback device. This because the mkfs.btrfs issues a BLKDISCARD ioctl which hangs mkfs.btrfs when the loopback device is used (or may be it requires a bit of time to process 8EB of data :-) ).
    Update 2012-10-06: Now mkfs.btrfs has the option '-T' to avoid issuing a BLKDISCARD ioctl.

  • Mount the loopback device and test it
    ghigo@venice:/tmp$ sudo mount /dev/loop0 /mnt/test
    ghigo@venice:/tmp$ df -h /mnt/test
    Filesystem      Size  Used Avail Use% Mounted on
    /dev/loop0      8.0E   56K  8.0E   1% /mnt/test
    

The maximum btrfs file size

The btrfs filesystems specifications state that the maximum file size is 16EB, the same limits is applied to the filesystem size.
However the linux kernel has a lower limit. In fact I was never able to create a file (even sparse) greater than 8EB. In the file header include/linux/fs.h of the linux kernel is reported:

  /* Page cache limit. The filesystems should put that into their
     s_maxbytes limits, otherwise bad things can happen in VM. */

  #if BITS_PER_LONG==32

  #define MAX_LFS_FILESIZE \
 (((u64)PAGE_CACHE_SIZE << (BITS_PER_LONG-1))-1)

  #elif BITS_PER_LONG==64

  #define MAX_LFS_FILESIZE 0x7fffffffffffffffUL

  #endif
This means that in a x86 environment (BITS_PER_LONG == 32) the maximum file size is about 8TB; instead in a x86-64 bit machine, the limit is 8EB ( == 0x7fffffffffffffff)

Note

This idea of post started from a message in the btrfs mailing list [2].

Reference

domenica 12 febbraio 2012

Remote laptop power-on

Preamble

My father has a laptop which is used as fixed computer. This is a very common usage: he has bought an external mouse, keyboard and monitor which are always connected to the laptop.
This set-up has the advantage of the comfort of a fixed station, and the portability of a laptop when needed.
However there are some disadvantages, the most annoying thing is the fact that the switch-on button is in a very uncomfortable position. From long time the manufactures moved the button from the side of the laptop to below the monitor. So the user should open the laptop before doing the switch-on.
In the case of my father, he put the laptop below the external monitor; so it is not easy for him to open the monitor and switch-on the computer.

I am still guessing the reason why the manufacturer moved the button from the side to below the monitor..

To avoid to open the laptop, a possible solution is to buy a docking station. But this is a very expensive solution. Also not all the laptop (noticeably the cheapest ones) have a docking station.

Finally the light

At work, my colleagues bought a support for a laptop for some exposition. This is a very expensive solution (around 1-2000 euros), but it has some very interesting solution (the desk is moveable, there are some drawers electronically blocked; a pin is required for the unlock...). But the one which caught my attention was how the laptop can be switched-on. It uses the WAKE ON LAN facility to power-on the laptop. Because the laptop could be inside this support, an external button is connected to a "magic black box"(tm), which is able to emit the WOL packet. Of course the laptop should be connected via lan to this "magic black box".

WAKE ON LAN

The WAKE ON LAN is a facility that every modern PC has. From wikipedia [1]


Wake-on-LAN (WOL) is an Ethernet computer networking standard that allows a computer to be turned on or woken up by a network message.

The message is usually sent by a program executed on another computer on the same local area network. It is also possible to initiate the message from another network by using Subnet directed broadcasts or a WOL gateway service. Equivalent terms include wake on WAN, remote wake-up, power on by LAN, power up by LAN, resume by LAN, resume on LAN, and wake up on LAN. In case the computer being woken is communicating via Wi-Fi, a supplementary standard called Wake on Wireless LAN (WoWLAN) must be employed.


After seeing this solution, I started to think how implement this for my father. I never mind to buy this "laptop support" due to its cost. I even searched on ebay, looking for something capable to act as WON "generator". I also evaluated if some embedded computer (like arduino, or raspberry_pi) could solve this problem. At the end I found that a router equipped with a custom firmware like DD-WRT [2] (or an equivalent one) could be a viable solution.

The router

I bought an used router DLink DIR-615, already equipped with DD-WRT. The router was quite cheap; but was without its power supply; at the end the cost of the power supply was greater than the cost of the (used) router :).

The DD-WRT distribution, is already equipped with some WOL facilities; via the administration web interface it is possible to send the WOL packet. Unfortunately this is impossible if the pc is switched-off. It is a typical chicken-egg problem :)

This kinds of routers are normally equipped with a button called SES-Button. This button is used to help the key exchange for wireless connection. But with the DD-WRT it is possible to associate other actions to the button.

When I received the router I faced with two problems:
1) The official way to handle the button event didn't work
2) It was not so simple to store the configuration changes

Using the SES-Button to generate the WOL packet

DD-WRT allows the user to handle the SES-Button event. If a script called <something>.sesbutton exists [3], it is called when the button is pressed. Unfortunately some tests quickly pointed out that on my router this didn't happen (see also this post [4])
I think that the real GPIO assignment is different from the one implemented in my firmware. With some testing I discovered that the SES Button is linked to the GPIO pin #0.

All my tests were performed with the stock gpio utility provided by the DD-WRT firmware. This utility has also the poll mode. So I tried to use it in a shell script to handle the SES Button event (GPIO #0). Quickly I discovered two problem of this program, which was not created to be used in a shell script:
1) the polling is continuously, this means that 100% CPU is used
2) this tool doesn't flush the buffer, so when it is used in a pipe the pipeline stalled.

The solution was to pick the source (which was gpl) and modify it. I downloaded the toolchains [5], then the program source [6]. The change was quite easy: removed all the unused code (I leaved only the code related to my hardware and the polling routines), add the missing fflush(2) call, add a call to usleep(3) in order to performs only 10 polls for second.

With these changes it was trivial to make a script which polls the button status, and when the button is pressed emit a WOL packet. Of course I added some led effects, when the button is pressed, as feedback.

Here [7] you can find all the source.

Storing the change

What was more difficult was to store these change. After a bit of test I discovered that not all routers have a writeable file-system. The only way to store something is to use the nvram (Non Volatile RAM). Fortunately the DD-WRT firmware during the boot looks at the nvram variable rc_startup, and it executes its value via the shell interpreter (ash - busybox). To make more complex the things, I have also a binary executable to run.
The solution was to build a script which deploys and runs all the other scripts/executable. A common technique is to append the files ( as uu-encoded tar archive) at the end of the script and to untar it in the filesystem.
The DD-WRT firmware didn't provide a "uudecode" utility. With a quick search on Internet I found a bash code capable to uu-decode [6]. I made a bit of hacking to support the syntax of ash.
Then I wrote a script (called build.sh) which joins this uu-decoder with the tar archive. The results is a script (called prg.sh) able to extract the self-contained archive; after the deploy, this script try also to execute the setup.sh command if present in the archive.

Below an excerpt of the resulted script, where I omitted the uudecode function, and the final blob:

#!/bin/ash


DEST=/tmp/

# this function is based on the one found on the following pages
# http://www.weeklywhinge.com/?p=108&cpage=1
# wringler should be the author
uudecode(){
[.....]
}

main(){

cat "$0" | (
skip=1
while read line; do
if [ "$line" = "# PUT THE UUENCODE TAR BELOW" ]; then
skip=0
break
fi
done
cat
) | uudecode | tar xz -C "$DEST"

[ -x $DEST/setup.sh ] && $DEST/setup.sh

}

main
exit

# PUT THE UUENCODE TAR BELOW
begin 644 file.tar.gz
M'XL(`)"T-T\``^U:76P;QQ$>_DB6J5BB_Q+&5IJEPM@R&I](_3JVU5)_D97*
MDJ`H3=(Z.%'D26)`D0<>Y3A%BA*.4_O!,`44!9P@0)7`3E-`J-WDI0].:Z`O
[....]


Summarizing:
- During the boot the DD-WRT firmware reads the value of the rc_startup from the nvram and executes this.
- this script extracts a self contained tar archive which contains:
1) the gpio_read executable, which is able to poll (10 times per seconds in order to avoid to use 100% CPU) a GPIO pin
2) the button_daemon shell script which emits the WOL packet when the SES Button is pressed
3) the setup.sh script aimed to make some further setup.
- After the unpacking the daemon is started by setup.sh

The main settings are stored in nvram. The following variable is used to configure the daemon:
- button_daemon_mac is the mac address of the host to power-on


Install

Below is show how install this software. As usual the following disclaimer is valid:
- it is assumed that the user is enough skilled for this kind of operations
- pay attention: there is always the risk to brick your router: I am not responsible if you brick your router, nor if you dog drink your beer
- this post is related to the DLINK DIR-615 equipped with the DD-WRT firmware (DD-WRT v24-sp2). It is very unlikely that you can use this script as is for other routers.

First you have to download the program:

root@DD-WRT:~# cd /tmp/
root@DD-WRT:/tmp# scp ghigo@192.168.7.27:/home/ghigo/ddwrt/gpio/tmp/prg.sh .

prg.sh is the deploy-er script, which can be found in [7].

Check the md5sum; it is not important that the your value is equal to the one of this post.
root@DD-WRT:/tmp# md5sum prg.sh 
6f11f31d2e469e87ece1872efdedba6f prg.sh

Install the software and check the checksum:
root@DD-WRT:/tmp# nvram set rc_startup="$( cat prg.sh )"
root@DD-WRT:/tmp# nvram get rc_startup | md5sum
6f11f31d2e469e87ece1872efdedba6f -

You must check that the two md5sum match. The values could be different from the one showed in this post, but the two ones calculated by you have to match.

Configure the mac address:
root@DD-WRT:/tmp# nvram set button_daemon_mac=00:08:74:08:cc:ce

00:08:74:08:cc:ce is the mac address of the target computer.

Finally perform a commit
root@DD-WRT:/tmp# nvram commit

Now you can reboot the router and test the system pressing the SES Button.

Conclusion

At the end I got an small object capable to start a laptop without opening it. In any case my father needed a router, so I didn't add other object on its desk.


Dir-615 GPIO connections

The table below show how some GPIO pins are connected:

GPIO Pin Function
#0 SES Button (0 pressed, 1 released)
#8 Orange main led (0 on, 1 off)
#9 Green main led (0 on, 1 off)
#11 Blue button led (0 on, 1 off)
#13 Red button led (0 on, 1 off)


References

[1] Wikipedia: WAKE ON LAN
[2] DD-WRT
[4] Forum on D-Link DIR-615 D3
[5] Development info - DD-WRT - Toolchain download
[6] gpio source
[6] uuencode implemented entirely in bash
[7] The archive with the scripts

mercoledì 30 marzo 2011

Android ed i LED (parte 2)

Aggiornamento 09-Settembre-2013:
Aggiornati i link.

Aggiornamento 27-Gennaio-2012:
Alcune applicazione impediscono il funzionamento di XLed quando arrivano gli SMS. In particolare GoSMS Pro impedisce la notifica quando arrivano gli SMS. Per ripristinare il corretto funzionamento bisogna disabilitare l'opzione "Disable other message notification". Vedi quà per ulteriori informazioni.


Aggiornamento 28-Novembre-2011: L'applicazione è ora disponibile nel market [3]. Purtroppo poiché è firmata in maniera diversa se avete una versione minore della 0.12 è necessario disinstallarla per poter installare quella del market.

A seguito del precedente post (Android ed i LED ) ho riscritto da zero un'applicazione per avere la notifica led di alcuni eventi quali la ricezione di un SMS e una telefonata senza risposta.

Tale applicazione è compatibile con lo LG Optimus ONE (purchè si abbiano i privilegi di root); tuttavia non escludo che possa essere compatibili con altri tipi di cellulari basati su Android. Il led che viene controllato è quello usato per illuminare i 4 tasti fisici.

Lo stato del led è controllato dal file
/sys/devices/platform/pmic-leds/leds/button-backlight/brightness
Basta scrivere nel file un valore 255 o 0 per, rispettivamente, attivare e disattivare i led.

Normalmente tale file non è scrivibile dalle applicazioni standard. Ma avendo disponibili i privilegi di root, si può renderlo scrivibile da tutti (i processi).

Installazione

Qui[1] potete trovare il file APK per installare il programma.

Dopo aver installato il programma, appena lanciato XLed prova a verificare se il file per controllare il Led è accessibile. Se tutto è andato OK vi troverete di fronte alla schermata seguente:


dove è possibile settare:

  • Enabled per abilitare o meno il programma
  • Blink on sms per abilitare o meno il lampeggio del led quando arriva un SMS
  • Blink on missing call per abilitare o meno il lampeggio del led in caso di una chiamata senza risposta
  • Set blink type per settare il numero di lampeggi: 1, 2, 3...
  • Set blink period per settare il periodo dei lampeggi
  • Set blink length per settare il la lunghezza dei lampeggi


Il default è 1 lampeggio (type = 1 flash blink) che dura 250ms (length = 250ms) ogni due secondi (period = 2 seconds).

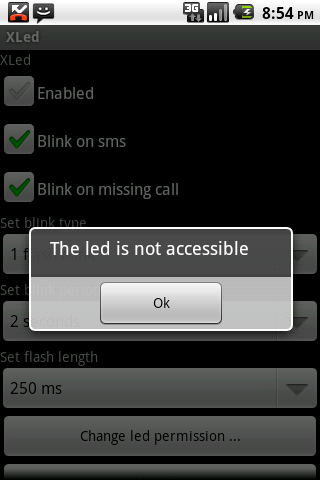
Il pulsante Change led permission... serve per abilitare l'accesso al file che controlla il led. L'abilitazione all'accesso al file di controllo richiede i privilegi di root. Una volta abilitato l'accesso i privilegi di root non vengono più usati. L'abilitazione deve essere rieseguita esplicitamente dopo ogni riavvio e la prima volta quando si installa il programma.

Note di compatibilità

Come detto sopra XLed controlla l'accesso al file che controlla il led. Se il file non è scrivibile, viene emesso il seguente messaggio:


A questo punto premendo il pulsante Change led permission... si rende il file di controllo accessibile (ripeto che è l'unico momento in cui sono necessari i privilegi di root).

In caso che il file non esista, invece appare il seguente messaggio:


purtroppo in questo caso non c'è nulla che si possa fare. Per un qualche motivo il file di controllo non esiste: tipicamente perche si sta usando il programma su di un telefonino Android sprovvisto di quel tipo di led. In tal caso, con un minimo di supporto da parte dell'utente, sono disponibile a modificare il programma per farlo funzionare su hardware diverso dal mio; ovviamente nei limiti del possibile e del tempo a disposizione.

Avvertenza

L'applicativo non è firmato. Ed ovviamente devo applicare il disclaimer standard:

l'uso di questo programma è a vostro rischio; non si fornisce alcuna garanzia né esplicita né implicita. C'è il rischio di danneggiare permanentemente il vostro telefonino, di votare un tizio basso con i capelli finti e appassionato di minorenni o di sperare in una fazione politica incosistente.


Licenza

Il programma è rilasciato sotto la licenza GPL v2, e potete trovare il sorgente qui[2]

Link
[1] File APK del programma (XLed.apk) [AGGIORNATO]
[2] Repository git del programma
[3] https://market.android.com/search?q=xled&so=1&c=apps

My little patches...

Below a list of my patches spread on different projects: Linux kernel [all] 2018-02-01 iversion: Rename make inode_cmp_iversion{+raw}...