domenica 12 febbraio 2012

Remote laptop power-on

Preamble

My father has a laptop which is used as fixed computer. This is a very common usage: he has bought an external mouse, keyboard and monitor which are always connected to the laptop.
This set-up has the advantage of the comfort of a fixed station, and the portability of a laptop when needed.
However there are some disadvantages, the most annoying thing is the fact that the switch-on button is in a very uncomfortable position. From long time the manufactures moved the button from the side of the laptop to below the monitor. So the user should open the laptop before doing the switch-on.
In the case of my father, he put the laptop below the external monitor; so it is not easy for him to open the monitor and switch-on the computer.

I am still guessing the reason why the manufacturer moved the button from the side to below the monitor..

To avoid to open the laptop, a possible solution is to buy a docking station. But this is a very expensive solution. Also not all the laptop (noticeably the cheapest ones) have a docking station.

Finally the light

At work, my colleagues bought a support for a laptop for some exposition. This is a very expensive solution (around 1-2000 euros), but it has some very interesting solution (the desk is moveable, there are some drawers electronically blocked; a pin is required for the unlock...). But the one which caught my attention was how the laptop can be switched-on. It uses the WAKE ON LAN facility to power-on the laptop. Because the laptop could be inside this support, an external button is connected to a "magic black box"(tm), which is able to emit the WOL packet. Of course the laptop should be connected via lan to this "magic black box".

WAKE ON LAN

The WAKE ON LAN is a facility that every modern PC has. From wikipedia [1]


Wake-on-LAN (WOL) is an Ethernet computer networking standard that allows a computer to be turned on or woken up by a network message.

The message is usually sent by a program executed on another computer on the same local area network. It is also possible to initiate the message from another network by using Subnet directed broadcasts or a WOL gateway service. Equivalent terms include wake on WAN, remote wake-up, power on by LAN, power up by LAN, resume by LAN, resume on LAN, and wake up on LAN. In case the computer being woken is communicating via Wi-Fi, a supplementary standard called Wake on Wireless LAN (WoWLAN) must be employed.


After seeing this solution, I started to think how implement this for my father. I never mind to buy this "laptop support" due to its cost. I even searched on ebay, looking for something capable to act as WON "generator". I also evaluated if some embedded computer (like arduino, or raspberry_pi) could solve this problem. At the end I found that a router equipped with a custom firmware like DD-WRT [2] (or an equivalent one) could be a viable solution.

The router

I bought an used router DLink DIR-615, already equipped with DD-WRT. The router was quite cheap; but was without its power supply; at the end the cost of the power supply was greater than the cost of the (used) router :).

The DD-WRT distribution, is already equipped with some WOL facilities; via the administration web interface it is possible to send the WOL packet. Unfortunately this is impossible if the pc is switched-off. It is a typical chicken-egg problem :)

This kinds of routers are normally equipped with a button called SES-Button. This button is used to help the key exchange for wireless connection. But with the DD-WRT it is possible to associate other actions to the button.

When I received the router I faced with two problems:
1) The official way to handle the button event didn't work
2) It was not so simple to store the configuration changes

Using the SES-Button to generate the WOL packet

DD-WRT allows the user to handle the SES-Button event. If a script called <something>.sesbutton exists [3], it is called when the button is pressed. Unfortunately some tests quickly pointed out that on my router this didn't happen (see also this post [4])
I think that the real GPIO assignment is different from the one implemented in my firmware. With some testing I discovered that the SES Button is linked to the GPIO pin #0.

All my tests were performed with the stock gpio utility provided by the DD-WRT firmware. This utility has also the poll mode. So I tried to use it in a shell script to handle the SES Button event (GPIO #0). Quickly I discovered two problem of this program, which was not created to be used in a shell script:
1) the polling is continuously, this means that 100% CPU is used
2) this tool doesn't flush the buffer, so when it is used in a pipe the pipeline stalled.

The solution was to pick the source (which was gpl) and modify it. I downloaded the toolchains [5], then the program source [6]. The change was quite easy: removed all the unused code (I leaved only the code related to my hardware and the polling routines), add the missing fflush(2) call, add a call to usleep(3) in order to performs only 10 polls for second.

With these changes it was trivial to make a script which polls the button status, and when the button is pressed emit a WOL packet. Of course I added some led effects, when the button is pressed, as feedback.

Here [7] you can find all the source.

Storing the change

What was more difficult was to store these change. After a bit of test I discovered that not all routers have a writeable file-system. The only way to store something is to use the nvram (Non Volatile RAM). Fortunately the DD-WRT firmware during the boot looks at the nvram variable rc_startup, and it executes its value via the shell interpreter (ash - busybox). To make more complex the things, I have also a binary executable to run.
The solution was to build a script which deploys and runs all the other scripts/executable. A common technique is to append the files ( as uu-encoded tar archive) at the end of the script and to untar it in the filesystem.
The DD-WRT firmware didn't provide a "uudecode" utility. With a quick search on Internet I found a bash code capable to uu-decode [6]. I made a bit of hacking to support the syntax of ash.
Then I wrote a script (called build.sh) which joins this uu-decoder with the tar archive. The results is a script (called prg.sh) able to extract the self-contained archive; after the deploy, this script try also to execute the setup.sh command if present in the archive.

Below an excerpt of the resulted script, where I omitted the uudecode function, and the final blob:

#!/bin/ash


DEST=/tmp/

# this function is based on the one found on the following pages
# http://www.weeklywhinge.com/?p=108&cpage=1
# wringler should be the author
uudecode(){
[.....]
}

main(){

cat "$0" | (
skip=1
while read line; do
if [ "$line" = "# PUT THE UUENCODE TAR BELOW" ]; then
skip=0
break
fi
done
cat
) | uudecode | tar xz -C "$DEST"

[ -x $DEST/setup.sh ] && $DEST/setup.sh

}

main
exit

# PUT THE UUENCODE TAR BELOW
begin 644 file.tar.gz
M'XL(`)"T-T\``^U:76P;QQ$>_DB6J5BB_Q+&5IJEPM@R&I](_3JVU5)_D97*
MDJ`H3=(Z.%'D26)`D0<>Y3A%BA*.4_O!,`44!9P@0)7`3E-`J-WDI0].:Z`O
[....]


Summarizing:
- During the boot the DD-WRT firmware reads the value of the rc_startup from the nvram and executes this.
- this script extracts a self contained tar archive which contains:
1) the gpio_read executable, which is able to poll (10 times per seconds in order to avoid to use 100% CPU) a GPIO pin
2) the button_daemon shell script which emits the WOL packet when the SES Button is pressed
3) the setup.sh script aimed to make some further setup.
- After the unpacking the daemon is started by setup.sh

The main settings are stored in nvram. The following variable is used to configure the daemon:
- button_daemon_mac is the mac address of the host to power-on


Install

Below is show how install this software. As usual the following disclaimer is valid:
- it is assumed that the user is enough skilled for this kind of operations
- pay attention: there is always the risk to brick your router: I am not responsible if you brick your router, nor if you dog drink your beer
- this post is related to the DLINK DIR-615 equipped with the DD-WRT firmware (DD-WRT v24-sp2). It is very unlikely that you can use this script as is for other routers.

First you have to download the program:

root@DD-WRT:~# cd /tmp/
root@DD-WRT:/tmp# scp ghigo@192.168.7.27:/home/ghigo/ddwrt/gpio/tmp/prg.sh .

prg.sh is the deploy-er script, which can be found in [7].

Check the md5sum; it is not important that the your value is equal to the one of this post.
root@DD-WRT:/tmp# md5sum prg.sh 
6f11f31d2e469e87ece1872efdedba6f prg.sh

Install the software and check the checksum:
root@DD-WRT:/tmp# nvram set rc_startup="$( cat prg.sh )"
root@DD-WRT:/tmp# nvram get rc_startup | md5sum
6f11f31d2e469e87ece1872efdedba6f -

You must check that the two md5sum match. The values could be different from the one showed in this post, but the two ones calculated by you have to match.

Configure the mac address:
root@DD-WRT:/tmp# nvram set button_daemon_mac=00:08:74:08:cc:ce

00:08:74:08:cc:ce is the mac address of the target computer.

Finally perform a commit
root@DD-WRT:/tmp# nvram commit

Now you can reboot the router and test the system pressing the SES Button.

Conclusion

At the end I got an small object capable to start a laptop without opening it. In any case my father needed a router, so I didn't add other object on its desk.


Dir-615 GPIO connections

The table below show how some GPIO pins are connected:

GPIO Pin Function
#0 SES Button (0 pressed, 1 released)
#8 Orange main led (0 on, 1 off)
#9 Green main led (0 on, 1 off)
#11 Blue button led (0 on, 1 off)
#13 Red button led (0 on, 1 off)


References

[1] Wikipedia: WAKE ON LAN
[2] DD-WRT
[4] Forum on D-Link DIR-615 D3
[5] Development info - DD-WRT - Toolchain download
[6] gpio source
[6] uuencode implemented entirely in bash
[7] The archive with the scripts

mercoledì 30 marzo 2011

Android ed i LED (parte 2)

Aggiornamento 09-Settembre-2013:
Aggiornati i link.

Aggiornamento 27-Gennaio-2012:
Alcune applicazione impediscono il funzionamento di XLed quando arrivano gli SMS. In particolare GoSMS Pro impedisce la notifica quando arrivano gli SMS. Per ripristinare il corretto funzionamento bisogna disabilitare l'opzione "Disable other message notification". Vedi quà per ulteriori informazioni.


Aggiornamento 28-Novembre-2011: L'applicazione è ora disponibile nel market [3]. Purtroppo poiché è firmata in maniera diversa se avete una versione minore della 0.12 è necessario disinstallarla per poter installare quella del market.

A seguito del precedente post (Android ed i LED ) ho riscritto da zero un'applicazione per avere la notifica led di alcuni eventi quali la ricezione di un SMS e una telefonata senza risposta.

Tale applicazione è compatibile con lo LG Optimus ONE (purchè si abbiano i privilegi di root); tuttavia non escludo che possa essere compatibili con altri tipi di cellulari basati su Android. Il led che viene controllato è quello usato per illuminare i 4 tasti fisici.

Lo stato del led è controllato dal file
/sys/devices/platform/pmic-leds/leds/button-backlight/brightness
Basta scrivere nel file un valore 255 o 0 per, rispettivamente, attivare e disattivare i led.

Normalmente tale file non è scrivibile dalle applicazioni standard. Ma avendo disponibili i privilegi di root, si può renderlo scrivibile da tutti (i processi).

Installazione

Qui[1] potete trovare il file APK per installare il programma.

Dopo aver installato il programma, appena lanciato XLed prova a verificare se il file per controllare il Led è accessibile. Se tutto è andato OK vi troverete di fronte alla schermata seguente:


dove è possibile settare:

  • Enabled per abilitare o meno il programma
  • Blink on sms per abilitare o meno il lampeggio del led quando arriva un SMS
  • Blink on missing call per abilitare o meno il lampeggio del led in caso di una chiamata senza risposta
  • Set blink type per settare il numero di lampeggi: 1, 2, 3...
  • Set blink period per settare il periodo dei lampeggi
  • Set blink length per settare il la lunghezza dei lampeggi


Il default è 1 lampeggio (type = 1 flash blink) che dura 250ms (length = 250ms) ogni due secondi (period = 2 seconds).

Il pulsante Change led permission... serve per abilitare l'accesso al file che controlla il led. L'abilitazione all'accesso al file di controllo richiede i privilegi di root. Una volta abilitato l'accesso i privilegi di root non vengono più usati. L'abilitazione deve essere rieseguita esplicitamente dopo ogni riavvio e la prima volta quando si installa il programma.

Note di compatibilità

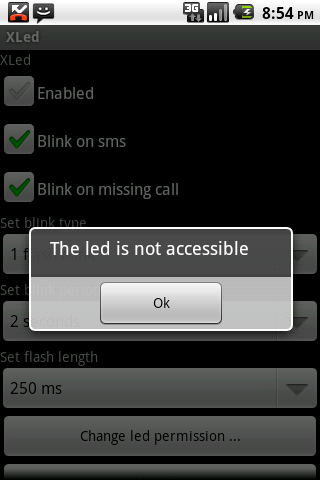
Come detto sopra XLed controlla l'accesso al file che controlla il led. Se il file non è scrivibile, viene emesso il seguente messaggio:


A questo punto premendo il pulsante Change led permission... si rende il file di controllo accessibile (ripeto che è l'unico momento in cui sono necessari i privilegi di root).

In caso che il file non esista, invece appare il seguente messaggio:


purtroppo in questo caso non c'è nulla che si possa fare. Per un qualche motivo il file di controllo non esiste: tipicamente perche si sta usando il programma su di un telefonino Android sprovvisto di quel tipo di led. In tal caso, con un minimo di supporto da parte dell'utente, sono disponibile a modificare il programma per farlo funzionare su hardware diverso dal mio; ovviamente nei limiti del possibile e del tempo a disposizione.

Avvertenza

L'applicativo non è firmato. Ed ovviamente devo applicare il disclaimer standard:

l'uso di questo programma è a vostro rischio; non si fornisce alcuna garanzia né esplicita né implicita. C'è il rischio di danneggiare permanentemente il vostro telefonino, di votare un tizio basso con i capelli finti e appassionato di minorenni o di sperare in una fazione politica incosistente.


Licenza

Il programma è rilasciato sotto la licenza GPL v2, e potete trovare il sorgente qui[2]

Link
[1] File APK del programma (XLed.apk) [AGGIORNATO]
[2] Repository git del programma
[3] https://market.android.com/search?q=xled&so=1&c=apps

lunedì 28 febbraio 2011

Android ed i LED

Schiavo della moda consumistica che ci circonda, anche io alla fine ho ceduto ed ho comprato un cellulare Android. Mi sono orientato verso un LG Optimus ONE.

Non voglio dilungarmi sulla qualità del prodotto, ci sono fior fiore di recensioni in giro. Quello che però subito mi ha dato sui nervi è la mancanza del cosidetto notification led.

Ho sempre trovato comodo la notifica luminosa: basta un istante e con sguardo e si sa se si è stato chiamato o meno...

Ho provato le varie alternative (NoLed, Missed Message Flasher...) ma nessuna di queste mi ha soddisfatto. Quello che facevano era accendere il display. Al massimo lavorando sul tempo di accensione si otteneva l'illuminazione del solo tastierino.

Osservando bene il cellulare però era evidente che l'ulliminazione del tastierino è indipendente da quello dello schermo. Il passo successivo è stato di capire come pilotare quest'accensione.

Alla fine questa è stata la parte più semplice. Spulciando sotto

/sys

Ho scoperto il file

/sys/devices/platform/pmic-leds/leds/button-backlight/brightness

che come dice il nome serve per attivare o disattivare il led del tastierino. Basta scriverci un valore di 255 per attivare l'illuminazione. Un valore pari a 0 serve per disattivare l'illuminazione.

Ovviamente per accedere al file bisogna avere un dispositivo root-ato.

Lo step successivo è consistito nel sviluppare un'interfaccia grafica. Sono partito dal progetto NotificationPlus [1], ed ho aggiunto quello che mi serviva:

  • notifica attraverso led
  • personalizzazione durata e numero di blink

Inoltre ho migliorato l'interazione con l'utente (in particolare la logica del "quando smettere di lampeggiare").

Il sorgente della mia versione potete trovarla qui [2]. Mentre il pacchetto *.apk lo potete trovare qui [3].
Per farlo funzionare è necessario prima root-are il telefono e dare

chmod 0666 /sys/devices/platform/pmic-leds/leds/button-backlight/brightness

NON è necessario che l'applicativo abbia i privilegi di root per funzionare.

La licena è la GPL V3, l'icona è tratta dal tema Oxygen di KDE4.

L'applicativo non è firmato. Ed ovviamente devo applicare il disclaimer standard:
l'uso di questo programma è a vostro rischio; non si fornisce alcuna garanzia né esplicita né implicita. C'è il rischio di danneggiare permanentemente il vostro telefonino, di votare un tizio basso con i capelli finti e appassionato di minorenni o di sperare in una fazione politica incosistente.
.

G.Baroncelli


[1] http://code.google.com/p/notification-plus/ (Jeff
Moyer); l'icona è tratta dal tema Oxygen KDE 4,http://people.freedesktop.org/~jimmac/icons/#oxygen

[2] http://cassiopea.homelinux.net/git/?p=notificationplus.git;a=summary
[3] http://cassiopea.homelinux.net/notificationplus/NotificationPlus.apk [sha256: 9d156c5cb0c1f6b66a420f60d347896afbb841e646b73c786eca18a69d3190ec]

sabato 2 gennaio 2010

Linux & BTRFS: an example of layout

BTRFS is one of the most interesting filesystem in the Linux ecosystem. It has a lot of features[1], and for me the most interesting is its "snapshot" capability.

In my opinion "snapshot" is not a correct name. Snapshot means a static copy at a specific time. But he BTRFS snapshots are classified as "writable". So instead of "snapshot", "fork" would be a better name. But in order to avoid confusion I will use the "snapshot" name.

In order to evaluate the BTRFS snapshot capability, I switched my ubuntu system from ext3 to btrfs. And now I will describe how I did.

First of all, I have to say that BTRFS is in a development phase: don't use it in production enviroment. In fact I experienced a nasty bug [2], which had lead to an OOPS [2]. Even though I never seen a kernel crash o lost any valuable data. In any case I left my home under ext3.
Finally I have to highlight that I had problem even with ext4. But it was a Ubuntu bug (see ext4 and jaunty problem [3]).

Objectives:

For this study my goals were:
  • to create a snapshot
  • ability to access to the snapshot
  • possibility to switch the system to an old snapshot temporarily and permanently

before highlighting the solution, I have to introduce how the BTRFS tools manage the snapshot.

Creating and destroying snapshot


The BTRFS filesystem may be partitioned in "subvolumes". In fact when a BTRFS filesystem it is created, it consist of one volume called "." (dot). After the creation a BTRFS filesystem may be populated by other subvolumes. Every subvolume is placed in the filesystem and may be renamed, moved or destroyed.

btrfsctl is the tool that creates and destroy a subvolume:
  • Create a sub volume named "foo" under the directory /bar
    btrfsctl -S foo /bar

    It must be noted that the subvolume is like a directory. It may be renamed or moved (but not destroyed) with the "mv" command

  • Destroy a sub volume named "foo" under the directory /bar
    btrfsctl -D foo /bar

The subvolumes have two key properties:
  1. the ability to mount the subvolume directly via the "subvol=" mount option. For example supposing to have a subvolume named "foo" under the root of the filesystem, it is possible to mount the subvolume using the following syntax:
    mount -t btrfs -o subvol=foo /dev/sdX /mntPoint
    It must be noted that a subvolume may be mounted only if it is created under the root of the BTRFS filesystem.

  2. a subvolume may be snapshoted
    Remember: only a subvolume may be snapshoted. If you want to create a snapshot (named "foo") of the subvolume "bar", the syntax is:
    btrfsctl -s foo /bar

Moreover it must be noted that a snapshot of a subvolume doesn't touch a nested subvolume.
Pay attention to the fact that a snapshot doesn't create copy of the files. The copy is performed only if the file is updated from the original subvolume or from the snapshotted subvolume.

Filesystem layout


On the basis of the information of the paragraph above, I organized my filesystem as:
/                (root of the btrfs filesystem)
/rootfs (root of the filesystem)
/snap-YYYYMMDD (snapshot of the root of the filesystem)
/snap-YYYYMMDD (2nd snapshot of the root of the filesystem)
/snap-YYYYMMDD (another snapshot of the root of the filesystem)

Where "rootfs" is a subvolume containing the filesystem (/sbin, /bin, /usr, etc.); "snap-..." are snapshots of the "rootfs" subvolumes.
The key is that the system is contained in a subvolume; the BTRFS root is used only to manage the snapshot and is not mounted as root.

My "/etc/fstab" contain lines like:
/dev/sdX   /            btrfs subvol=rootfs,defaults 
/dev/sdX /var/btrfs btrfs subvol=.,defaults

And in my grub config file there is a line like:
kernel          /vmlinuz root=/dev/sdX ro rootflags=subvol=rootfs
Note the file above is strictly debian/ubuntu specific. In fedora the line above should be
kernel          /vmlinuz root=/dev/sdX ro rootfsflags=subvol=rootfs

How to snapshot


As explained above, the root of the BTRFS filesystem is placed in /var/btrfs. Under this directory there is the rootfs subvolume and its snapshots. If I want to a create new snapshot I have to do:
# cd /var/btrfs
# btrfsctl -s snap-<date> rootfs
If I want to access to an old file, then I can pick it from the snap-<date> subvolumes.

How to switch to a snapshot


There are two method to switch to a snapshot. In every case I have to reboot the machine
  1. rename the snapshot (permantely method)
    This method requires to rename the snapshot:
    # cd /var/btrfs
    # mv rootfs old-rootfs
    # mv snap-<date> rootfs
    Remember ? I said that a subvolume may be renamed with a simple "mv" command. During the next reboot the system will use the "rootfs" subvolume, which is the renamed "snap-<date>" subvolume.
  2. using a different subvolume ( temporarily method)
    This method requires to handle the grub boot entry. If I replace the part "subvol=rootfs" with "subvol=snap-<date>", the system will reboot with the old snapshot as filesystem.
    The entry may:
    1. be edited during the boot time (grub permits that)
    2. added as further boot entry in the grub menu list. So at the boot time the system leaves the user to select the real filesystem or an old snapshots

Conclusion


For my box(es) I created a script which handles the snapshot creation and deletion, and the adding of the entries in the grub config file.
I am studing how manage the home(s) in the subvolume. It may be useful to switch to a "system" snapshot without affecting the user home directories and viceversa. The idea is to create a subvolume per user. Every user should have the ability to create a snapshot of its home.
For desktop system it is easy and funny, for server system it has to be evaluated also the space consumption. If you remeber the snapshotting doesn't create a copy of file. The copy is performed only if the file is update (COW semantics). That means that if I change an already snapshotted file without touching the size, I create a copy of the old content even if I doesn't alter the file-size. This kind of problem are today uncommon, and it will require time to be fully understood and handled properly by the system administrators.


[1] See http://btrfs.wiki.kernel.org/index.php/Main_Page#Features
[2] See http://www.mail-archive.com/linux-btrfs@vger.kernel.org/msg03588.html
[3] See https://bugs.launchpad.net/ubuntu/+source/linux/+bug/330824

My little patches...

Below a list of my patches spread on different projects: Linux kernel [all] 2018-02-01 iversion: Rename make inode_cmp_iversion{+raw}...